Purpose
This documentation is intended for developers and users of zela.io and serves as a central reference for understanding how to work with the platform.
The goal of this documentation is to:
- provide a high-level understanding of how zela.io is structured,
- explain how to deploy and manage procedures,
- describe how to debug common issues,
- outline support workflows,
- clarify the terms of platform usage.
The documentation focuses on practical usage and operational concepts rather than internal implementation details. It is suitable for both new users onboarding to zela.io and experienced users looking for a consistent reference.
Introduction
zela.io is a platform for deploying and executing Solana procedures in a controlled and scalable environment.
Zela lets you send a procedure to run next to the current Solana block producer, so your application gets the full workflow outcome in a single call instead of many separate RPC requests.
Think of it as a Solana-compatible JSON-RPC layer where you can deploy custom procedures that run in Zela’s execution environment and interact with Solana RPC nodes on your behalf.
Benefits
- Latency-critical, multi-step workflows can run as one tight loop next to the block producer.
- Lower end-to-end latency for real workflows, not just for individual transactions.
- Latency is not only reduced but also more stable and predictable.
- Higher reliability: fewer broken chains of RPC calls, fewer expired quotes, fewer user-visible errors.
Terminology
- Procedure — a unit of user code implementing the
CustomProceduretrait, compiled to WebAssembly and invocable via Zela JSON-RPC. Runs on Zela infrastructure with low latency to the Solana Leader. - Procedure source — configuration within a project that defines where to fetch and how to build a procedure: repository, branch, and Cargo package name.
- Workspace — the top-level entity on zela.io, intended to represent a company or team. All projects, procedures, builds, and API keys belong to a workspace.
- Project — an organizational unit within a workspace. Groups procedures and API keys; each API key is scoped to a single project and can only execute procedures belonging to it.
- Build artifact — the compiled WebAssembly output produced from a procedure source at a specific commit.
- Identifier hash — the Git commit hash of the source code a build was compiled from or SHA-1 hash of the WebAssembly (WASM) file, if you manually upload your procedure. Serves as the procedure version identifier in the JSON-RPC method call.
Architecture Overview
zela.io is built as a set of specialized modules that work together to build, execute, and expose procedures. Each component has a clear responsibility, which helps keep the platform reliable, scalable, and easier to operate. At a high level, the platform consists of the following core components:
Builder
The Builder module is responsible for turning source code into WebAssembly procedure artifacts.
It handles:
- fetching source code from the configured Git repository,
- compiling procedures from Rust to WebAssembly,
- storing build artifacts,
- exposing a build result with a clear status (Pending, Building, Success, Error or Cancel).
Only successfully built procedures can be executed by the platform.
Executor
The Executor module is responsible for running built procedures in an isolated execution environment.
It handles:
- instantiating WebAssembly into native code,
- executing procedures on incoming requests,
- caching instances to avoid cold start latency,
- isolating execution from other workloads,
- collecting execution-related metadata (logs, traces, metrics).
The Executor ensures that procedures run in a controlled and predictable manner and that they run as fast as possible.
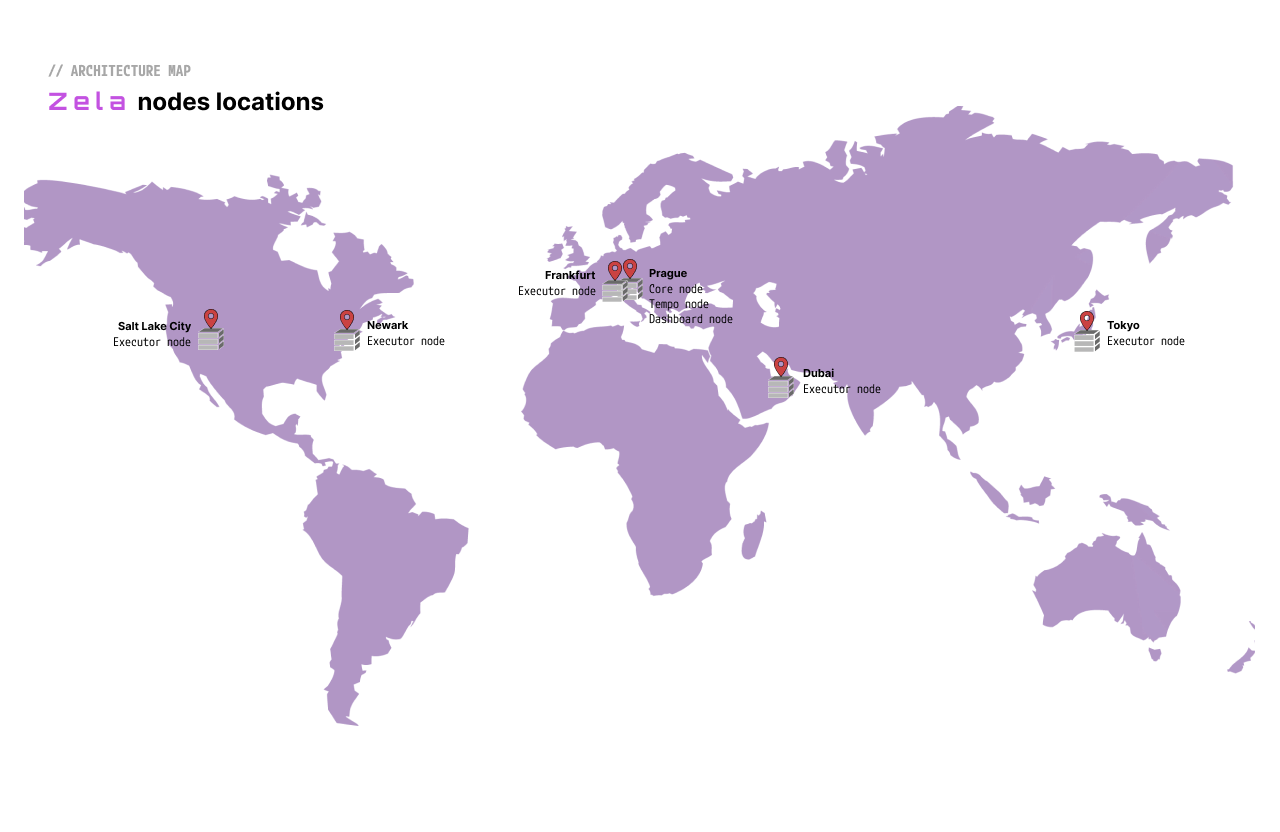
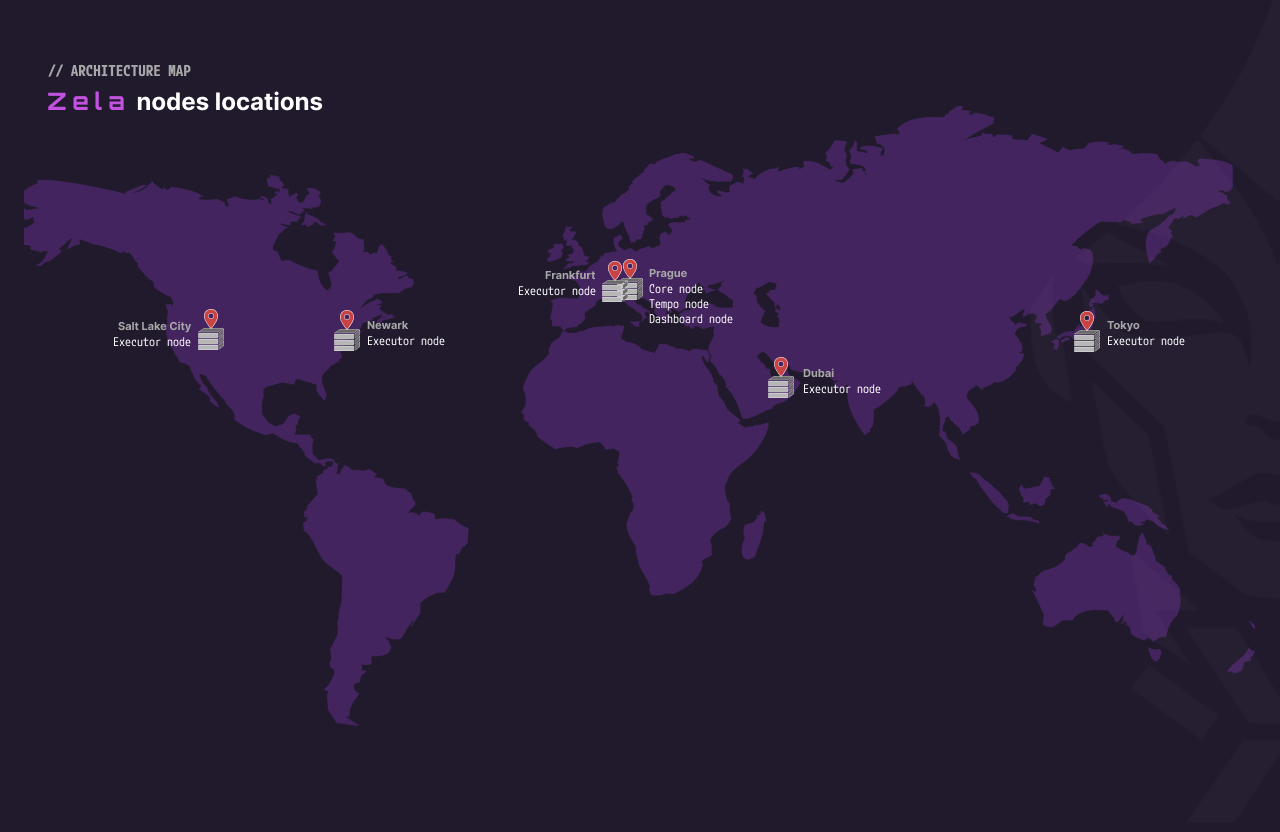
The Executor is not a singular instance. It is deployed in multiple geographical locations corresponding to Solana hotspots — places where existing Solana traffic is concentrated. This placement ensures that your procedures run as close as possible to the Solana Leader and access the most up-to-date chain state.
Solana Proxy
The Solana proxy module provides access and smart selection of upstream Solana RPC nodes.
It is used to:
- call built-in Solana RPC methods from custom procedures,
- track upstream health and latency,
- pick the upstream to serve individual subrequests.
The Solana proxy ensures that each time a procedure requests data, it reaches the upstream with the lowest round-trip latency from the Executor server.
Dashboard & API Layer
The Dashboard and API layer provide the main interface to the zela.io platform.
They are used for:
- managing projects and sources,
- triggering and monitoring builds,
- viewing build and execution logs,
- managing permissions and access.
This layer is designed to support both human users (via the Dashboard UI) and programmatic access (via APIs).
Component Interaction (High Level)
At a high level, the interaction flow is as follows:
- A procedure source is configured via the Dashboard.
- The source points to a branch in a GitHub repository.
- This configuration is stored in the Core service.
- The Builder compiles and validates the procedure source.
- The Builder is able to access the GitHub repository thanks to access granted through our Zela GitHub App.
- The build is performed in a containerized environment and the build logs are available in the Dashboard.
- The output WebAssembly artifact is stored in our database.
- A successful build becomes available for execution.
- The build is identified by its identifier hash, so you always know which source code you are running.
- The JSON-RPC
methodname is alwayszela.PROCEDURE_NAME#IDENTIFIER_HASHtogether with an appropriate JWT authentication token.
- The Executor runs the procedure on demand.
- Performing a JSON-RPC call to the executor triggers a load to cache.
- The WebAssembly artifact is loaded and compiled to native code on the Executor itself.
- The Dashboard exposes logs and metadata.
- Execution logs are available for each revision.
Accounts
Your account is tied to your email address and is personal. When you sign up, you receive a verification email and must verify your address before you can use the platform.
From your account login you can update your profile and change your password. If you forget your password, use the Forgot password link on the login page to reset it.
Roles and Permissions
In the current version of zela.io, all members of a workspace have equal rights. Every member can:
- invite new users to the workspace,
- remove other members,
- create, edit, and delete projects, procedures, and API keys,
- view all builds and execution logs,
- manage workspace settings.
In practice, every workspace member is a workspace admin. Granular roles and permissions are planned for a future release.
Inviting Users
Any workspace member can invite new users from the workspace settings by entering their email address. The invitee receives an email with a link to join. Once they accept and either create an account or sign in with an existing one, they gain full access to the workspace.
Currently, a user who is already a member of another workspace cannot be invited.
If you encounter this problem, please contact support@zela.io via e-mail.
Removing Users
Any workspace member can remove another member from the workspace settings. Removed users immediately lose access to all workspace resources, but their account itself remains intact.
API Keys and User Accounts
API keys belong to a project, not to an individual user. Removing a user from a workspace does not invalidate any API keys — integrations and deployed automations continue to work. To revoke API access, manage keys directly in the project’s Keys tab.
Closing a Workspace
A workspace must always have at least one member — it cannot exist without a user. This means you cannot remove the last remaining account from a workspace.
If you want to close a workspace entirely, contact support@zela.io and we will delete the workspace on your behalf.
Security
Non-Custodial Execution
Zela does not hold user private keys. Procedures operate on pre-signed transactions, or the client handles signing on their own infrastructure. Zela never has the ability to sign transactions on your behalf.
Authentication
Access to Zela APIs uses a layered model:
- Each project has one or more API keys.
- API keys are exchanged for short-lived JWTs via the OAuth2 flow.
Transport Security
All Zela endpoints (executor.zela.io, core.zela.io, auth.zela.io) are served exclusively over TLS. Plain HTTP requests are rejected.
Procedure Isolation and Safety by Design
Procedures run inside an isolated WebAssembly sandbox on the Executor. WebAssembly is a memory-safe, capability-based execution environment: procedures cannot access host memory, the host filesystem, or arbitrary network sockets. All outbound communication is routed through the Zela proxy, which is the only path procedures have to the outside world.
This isolation applies between tenants as well — procedures belonging to one workspace cannot read memory, state, or network traffic of procedures belonging to another workspace.
The same model applies regardless of how the procedure was produced:
- GitHub-built procedures — Zela fetches source code from your linked repository, compiles it to WebAssembly inside a containerized build environment, and stores only the resulting WASM artifact. The source code is used for the build only and is not shared outside your workspace. Zela does not inspect, copy, or otherwise process your source code beyond what is required to compile it.
- Manually uploaded procedures — When you upload a pre-compiled WASM artifact, Zela stores and runs it without any access to the underlying source code.
In both cases, what runs on the Executor is a WebAssembly artifact in an isolated sandbox — your code is safe by design and remains your own.
Source Code and Repository Access
When you link a GitHub repository through the Zela GitHub App, Zela receives access only to the repositories you explicitly authorize. You can revoke this access at any time from your GitHub account settings.
Build Artifact Integrity
Every build is identified by a cryptographic hash — the Git commit hash for GitHub-linked sources, or the SHA-1 of the WASM file for manual uploads. The identifier hash is part of every JSON-RPC method call, so you always know exactly which artifact is being executed and an artifact cannot be silently substituted.
Reporting Security Issues
If you discover a security vulnerability or have a security-related concern, please contact us at support@zela.io.
Quick Start
This section walks you from zero to a running procedure execution. It assumes you have a zela.io account and have completed the Onboarding (your first project is created automatically).
Step 1: Create a Procedure
In the Dashboard, open your project and create a new procedure.
A procedure is tied to a GitHub repository branch and Cargo package name so the Builder knows what to compile. Fill in:
- Repository — the GitHub repository containing your Rust crate (must be a Cargo workspace or crate).
- Branch — the branch to build from.
- Package name — the Cargo package name of the procedure.
Grant repository access via the Zela GitHub App when prompted. Linking a GitHub repository is optional, but without it you will have to compile and upload the procedure yourself. For more information about manual upload, see Manual upload section.
No procedure yet? Fork zela-demo as a starting point.
Step 2: Trigger a Build
A build starts automatically when you create the procedure and link the repository. Subsequent builds are triggered by pushing to the configured branch.
Open your procedure in the Dashboard and wait for the status to change to Success. If it lands on Error, open the build logs to see the compilation output.
Step 3: Obtain a JWT
Calls to the Executor require a short-lived JWT. Generate one from your project API key (find it in the Dashboard under API Keys):
response=$(curl -sS \
    --user "$KEY_CLIENT_ID:$KEY_SECRET" \
    --data-urlencode 'grant_type=client_credentials' \
    --data-urlencode 'scope=zela-executor:call' \
    'https://auth.zela.io/realms/zela/protocol/openid-connect/token')

echo "$response" | jq '.'
ZELA_JWT=$(echo "$response" | jq -r '.access_token')
KEY_CLIENT_ID and KEY_SECRET are shown in the Keys tab.
Step 4: Execute the Procedure
Send a JSON-RPC request to https://executor.zela.io using the JWT and the identifier hash from the successful build:
curl --header "authorization: Bearer $ZELA_JWT" \
    --header 'Content-Type: application/json' \
    --data '{
        "jsonrpc": "2.0",
        "id": 1,
        "method": "zela.YOUR_PROCEDURE_NAME#YOUR_IDENTIFIER_HASH",
        "params": {}
    }' \
    'https://executor.zela.io'
Replace YOUR_PROCEDURE_NAME with the procedure name and YOUR_IDENTIFIER_HASH with the full identifier hash shown on the successful build.
The first call may take a few seconds while the Executor loads the procedure into cache. Subsequent calls will be fast.
Deploying a Procedure
This section describes the high-level steps required to deploy a procedure on zela.io, from source configuration to a successful build.
Creating a Procedure Source
To deploy a procedure, a source must first be created within a project. Your first and default project is created during the Onboarding.
A source defines how WASM artifacts are materialized in Zela. We support automatic builds from GitHub and manual uploads of WASM artifacts.
For GitHub the configuration includes:
- the Git repository where the procedure code is stored,
- the branch to build from,
- the Cargo package name.
The Git repository must be a Rust Cargo workspace or a crate. Linking a GitHub repository is optional.
Once a source is created, it becomes the basis for building and deploying procedures on the platform.
Triggering a Build
After a source is configured, a build can be triggered to compile and validate the procedure.
Builds are triggered on push events to your GitHub repository (filtered by the configured branch) and automatically when creating the source in the Dashboard UI. If you have not linked a GitHub repository to your procedure source, see Manual upload below.
Make sure Cargo.lock is versioned and updated in your commits.
Be careful when updating your crates: there can be version conflicts with the zela-sdk
or problems with WASM compilation.
We recommend using the Cargo.lock published in Zela demo repository as your base.
Each build is tracked independently and has a clearly defined lifecycle.
Build Lifecycle
Every build progresses through a set of well-defined states:
- Pending — the build is queued and waiting to be processed by our server.
- Building — the source code is being compiled. Build logs are visible after the build finishes.
- Success — the build completed successfully, and the procedure is ready to be executed.
- Error — the build failed due to compilation or validation errors.
- Cancel — the build has been canceled.
Only builds that reach the Success state can be used by the Executor.
Builds can fail for multiple reasons. Review the build logs to see if the error is related to the source code or something else.
To avoid redundant work, builds for an identifier hash that has already been successfully built may be automatically canceled. In that case, the previously successful build is reused.
API Key Access
The first step of accessing the Zela API using your project API key is obtaining a JWT. The JWTs are short-lived tokens but can be generated asynchronously and used when calling Zela JSON-RPC or the Executor.
To obtain the JWT, perform a client_credentials OAuth2 flow against our Identity Provider with one of your project API keys. You can generate and inspect a project API key in the Dashboard Keys tab.
The authentication credentials in the header have to be base64 encoded. You can encode manually:
base64_auth=$(echo -n "$KEY_CLIENT_ID:$KEY_SECRET" | base64)
curl --header "Authorization: Basic $base64_auth" \
    ...
Or let curl do it for you:
response=$(curl -sS \
    --user "$KEY_CLIENT_ID:$KEY_SECRET" \
    --data-urlencode 'grant_type=client_credentials' \
    --data-urlencode 'scope=zela-executor:call zela-builder:read zela-builder:write' \
    'https://auth.zela.io/realms/zela/protocol/openid-connect/token')

ZELA_JWT=$(echo "$response" | jq -r '.access_token')
Once you have obtained the access_token from the response, use it as Bearer authentication for your JSON-RPC calls.
Scope Types
Zela uses token scopes for limiting access to its resources. Here is what each scope is needed for:
zela-executor:call: allows execution of a procedure in a project tied to the project API key and general calls to Zela JSON-RPC endpoints,zela-builder:readandzela-builder:write: both are needed to upload compiled procedures.
Manual Upload
Each procedure source can also be used without providing source code by uploading build WASM artifacts directly to Zela.
We expect a WASM Component that fulfills this WIT world. For Rust we provide the zela-std crate, then build for the wasm32-wasip2 target and cdylib crate type. Check out our zela-demo repository to help you get started.
Prerequisites
Install the Rust compilation target for wasm32-wasip2.
rustup target add wasm32-wasip2
Download and set up wasi-sdk, which is needed for compiling C/C++ dependencies used in
Solana crates.
Latest release can be found on WebAssembly GitHub.
Make sure to download the appropriate file for your operating system and platform.
Example for macOS ARM64:
# Download sdk
curl -L https://github.com/WebAssembly/wasi-sdk/releases/download/wasi-sdk-32/wasi-sdk-32.0-arm64-macos.tar.gz \
  -o /tmp/wasi-sdk-32.tar.gz \
  && tar xzf /tmp/wasi-sdk-32.tar.gz -C /tmp

# Move to permanent location
mv /tmp/wasi-sdk-32.0-arm64-macos "$HOME/.wasi-sdk"

# Export environment variables (to persist, add to ~/.zshrc)
export CC_wasm32_wasip2="$HOME/.wasi-sdk/bin/clang"
export WASI_SYSROOT="$HOME/.wasi-sdk/share/wasi-sysroot"
Compilation and Upload
cargo build --target wasm32-wasip2 --release --package hello_world
Once you have built your WASM artifact, you can upload it to Zela using the Dashboard by editing your procedure or through our API:
ZELA_PROJECT_UUID=your_project_uuid
YOUR_PROCEDURE_NAME=your_procedure_name
curl -f \
    --header "authorization: Bearer $ZELA_JWT" \
    --header 'content-type: application/wasm' \
    --data-binary '@target/wasm32-wasip2/release/hello_world.wasm' \
    "https://core.zela.io/procedures/$YOUR_PROCEDURE_NAME/wasm?project=$ZELA_PROJECT_UUID&file_name=hello_world.wasm"
You can obtain the ZELA_PROJECT_UUID in two ways:
- Copy
Project IDfrom your procedure detail in the Dashboard. - Parse it from the project API key.
- API key structure:
rpk-ZELA_PROJECT_UUID-INTERNAL_UUID - UUID v4 structure:
xxxxxxxx-xxxx-4xxx-axxx-xxxxxxxxxxxx
- API key structure:
To obtain the ZELA_JWT, use one of your project API keys as described in the API Key Access section.
Make sure the token includes both the zela-builder:read and zela-builder:write scopes to be allowed to upload procedures.
For further inspiration, take a look at our demo GitHub Actions workflow file which implements manual upload.
After a Successful Build
Once a build completes successfully:
- the procedure becomes available for execution,
- the Executor can start processing requests using this build,
- build logs and metadata remain accessible for inspection.
From this point, the procedure can be executed and monitored through the platform.
Execution & Debugging
This section describes how procedures are executed on zela.io and how common issues can be investigated and resolved.
Executing a Procedure
A procedure becomes available for execution once it has been built successfully.
Procedures are executed by sending a JSON-RPC HTTP request to the executor URL: https://executor.zela.io.
curl --header "authorization: Bearer $ZELA_JWT" \
    --header 'Content-Type: application/json' \
    --data '{
        "jsonrpc": "2.0",
        "id": 1,
        "method": "zela.zela-demo#32902637cc96f8d95ee436d1e9ea30e49abd06b0",
        "params": {
            "first_number": 123,
            "second_number": 456
        }
    }' \
    'https://executor.zela.io'
This executes procedure zela-demo with build identifier hash 32902637cc96f8d95ee436d1e9ea30e49abd06b0 from the project tied to the JWT. If the Executor does not have the procedure cached, it will take a few seconds to load it into memory. Afterwards, it will use the cached procedure and apply your configured concurrency limits (as configured in the Onboarding or Dashboard).
- Each procedure has configurable concurrency limits that control how many requests can run in parallel. You can adjust these limits in the Onboarding workflow and Dashboard.
If you used manual procedure upload then your procedure is identified by the SHA-1 hash of your .wasm file instead of a Git commit hash.
sha1 ./target/wasm32-wasip2/release/hello_world.wasm
Direct Solana RPC Calls
Zela can also be used as a low-latency Solana JSON-RPC proxy without deploying a custom procedure. You can call standard Solana RPC methods directly through the executor endpoint — useful when you need the latency benefits of Zela’s infrastructure for individual reads or writes without custom logic.
curl --header "authorization: Bearer $ZELA_JWT" \
    --header 'Content-Type: application/json' \
    --data '{
        "jsonrpc": "2.0",
        "id": 1,
        "method": "getLatestBlockhash",
        "params": []
    }' \
    'https://executor.zela.io'
Authentication follows the same JWT flow described in API Key Access with scope zela-executor:call.
Request Routing
By default, Zela automatically routes your request to the instance group closest to the current Solana Leader, optimizing for the lowest end-to-end latency.
Instance groups are logical labels that each represent one or more servers in a specific location:
| Label | Location |
|---|---|
fr2 |
Frankfurt (Europe) |
tyo |
Tokyo (Asia-Pacific) |
dx1 |
Dubai (Middle East) |
ewr |
Newark, NJ (North America East) |
slc |
Salt Lake City, UT (North America West) |
You can override routing behavior by including the zela-route-by header in your request:
| Value | Behavior |
|---|---|
auto |
Follows the Solana Leader |
static <instance_label> |
Forwards to the specified instance group |
Example — pin execution to Frankfurt:
curl --header "authorization: Bearer $ZELA_JWT" \
    --header 'Content-Type: application/json' \
    --header 'zela-route-by: static fr2' \
    --data '{
        "jsonrpc": "2.0",
        "id": 1,
        "method": "zela.YOUR_PROCEDURE_NAME#YOUR_IDENTIFIER_HASH",
        "params": {}
    }' \
    'https://executor.zela.io'
Static routing is useful when you need to pin execution to a specific region for testing or when your counterparty is in a known location.
Using Logs for Debugging
Logs are the primary source for debugging issues on zela.io.
Typical use cases include:
- reviewing build logs to identify compilation or validation errors,
- inspecting execution logs to diagnose runtime failures.
To emit logs from your procedures, use the log crate integration enabled in our zela-std crate. Note that the default maximum log level is set to INFO, but can be configured in your procedure at compile time.
Common Debugging Steps
When a procedure does not behave as expected, the following steps are recommended:
- Ensure the source configuration (repository, branch, procedure name) is correct.
- Verify that the latest build completed successfully.
- Review build logs for errors or warnings.
- Make sure
Cargo.lockis versioned and committed to GitHub. - Try to build locally. For more information on local builds, see Manual upload section.
- Make sure
- Inspect execution logs for runtime failures.
- Confirm that input parameters are valid and correctly formatted.
-
If you are using solana-client RpcClient::send, please note that the client requires the parameters to be an array. If you wish to use the RpcClient to also interact with zela.io you can wrap your input parameters in an array:
  impl CustomProcedure for YourProcedure {
  	type Params = [YourParams; 1];
  	// ...

  	async fn run(params: Self::Params) -> Result<Self::SuccessData, RpcError<Self::ErrorData>> {
  		let [params] = params;
  		// ... your code
  	}
  }
-
Limitations
This section lists the current limitations of Zela. All of them are planned to be addressed in our roadmap.
No Concurrency
The procedure execution environment does not support concurrent async operations.
All await calls are executed sequentially — there is no multi-threading or parallel task scheduling available.
This means constructs that rely on concurrent futures will not work as expected. For example, you cannot use tokio::select! to impose a timeout on an RPC call or stream response:
// This will NOT work — tokio::select! requires concurrent task execution
tokio::select! {
    result = rpc_client.get_latest_blockhash() => { /* ... */ }
    _ = tokio::time::sleep(Duration::from_secs(1)) => { /* timeout */ }
}
Design your procedures to rely on sequential awaits and use the timeouts provided by the underlying RPC client configuration instead.
Procedures Cannot Call Other Procedures
A procedure cannot invoke another Zela procedure during its execution. If you need shared logic, extract it into a Rust library crate and include it as a dependency in your procedure.
No Shred Stream Access
Procedures cannot subscribe to or consume a Solana shred stream. Solana breaks each block into ~1.2 KB chunks called shreds and broadcasts them via the Turbine protocol before the block is fully confirmed, allowing latency-sensitive applications to observe transaction data in real time. Procedures run on demand in response to a JSON-RPC call and currently do not have access to this pre-confirmation data feed.
No Automatic or Scheduled Execution
Procedures are only executed in response to an explicit JSON-RPC call. There is no built-in support for triggering a procedure automatically based on a condition (such as an on-chain event) or on a time-based schedule (such as a cron job). Any scheduling or event-driven triggering must be implemented externally by the caller.
There is no hard timeout on procedure runtime, but once a procedure starts executing, it cannot follow a new Solana Leader mid-run. Procedures are designed for latency-critical, fast execution, not for long-running jobs such as waiting for a specific on-chain state.
Versions
This section explains how zela.io platform versions are identified and how they relate to the procedures you deploy.
Platform Versioning
The zela.io platform itself is updated independently of your procedures. Platform updates may affect execution behavior, available features, or supported interfaces. Where changes are breaking or significant, they will be communicated in advance through the Dashboard and release notes.
Procedure Versioning
Each deployed procedure is identified by the identifier hash of the source code it was built from.
The JSON-RPC method name always includes this hash in the format zela.PROCEDURE_NAME#IDENTIFIER_HASH.
This means you always know exactly which version of your code is executing.
Build Reuse
Builds are deduplicated by identifier hash. If a procedure source has already been successfully built for a given identifier hash, subsequent build requests for the same hash may be automatically canceled and the existing artifact reused.
Older Builds
Build artifacts and logs for previous procedure identifier hashes remain accessible in the Dashboard for inspection. However, Zela does not guarantee indefinite retention of artifacts from older builds. Procedures that have not been executed or updated for an extended period may have their cached artifacts evicted from the Executor.
Additional Resources
AI assistant skill
zela-assistant is an agent skill that gives any compatible AI assistant (Claude Code, the Claude API, claude.ai, and other tools that follow the open skill standard) the context it needs to help you build on Zela.
It bundles concrete, copy-paste-ready facts snapshotted from the zela-demo crates and these docs, plus a procedure scaffold under assets/templates/, and tells the AI assistant when to refetch live information from this site and from the zela-std SDK source on GitHub.
Purpose
Use the skill to get assistant help with:
- Setting up a development environment (Rust toolchain,
wasm32-wasip2target). - Scaffolding a new procedure crate from a template.
- Compiling a procedure to WebAssembly and running native unit tests.
- Calling deployed procedures via the Zela executor (OAuth, WASM upload, JSON-RPC).
- Debugging build failures.
- Answering general Zela questions by routing to this documentation and the SDK source.
The skill is intentionally not a replacement for the docs — it points the assistant at the canonical sources so its answers stay current as Zela evolves.
Where it lives
The skill is shipped inside the zela-ai-skills: zela-assistant repository at skills/zela-assistant/.
Installation
Pick whichever option matches how you use your assistant.
Option 1 — Clone and copy into a project (recommended for Claude Code).
git clone https://github.com/Zela-io/zela-ai-skills.git
mkdir -p /path/to/your-project/.claude/skills
cp -r zela-ai-skills/skills/zela-assistant /path/to/your-project/.claude/skills/
Claude Code auto-discovers any skill under .claude/skills/ in the working directory.
Option 2 — Copy into another project.
mkdir -p /path/to/your-project/.claude/skills
cp -r /path/to/zela-ai-skills/skills/zela-assistant /path/to/your-project/.claude/skills/
Option 3 — Install at the user level (available in every Claude Code session).
mkdir -p ~/.claude/skills
cp -r /path/to/zela-ai-skills/skills/zela-assistant ~/.claude/skills/
Option 4 — Other assistants / API. The skill follows the agentskills.io open standard: zip the zela-assistant/ folder and upload it wherever your tool accepts skill bundles.
Usage
Once installed, ask your assistant Zela-related questions in natural language — for example:
- “Scaffold a new Zela procedure called
slot_watcher.” - “Why does my procedure fail to compile to
wasm32-wasip2?” - “How do I call the deployed
priority_feesprocedure from Python?”
The assistant will load the skill automatically when it detects a Zela-related task, consult its bundled references, and refetch from the live docs or SDK source when an answer might depend on recently changed behavior.
Disclaimer
The skill is provided as-is, use at your own risk. AI assistants can make mistakes — always review generated code, commands, and configuration before running them, especially anything that signs transactions, uploads artifacts, or changes deployed procedures. The skill is a productivity aid, not a substitute for understanding the system you are operating.
Other resources
- Zela demo repository — provides helpful procedure examples. This is an excellent starting point for new users.
- Zela std repository — provides the procedure trait and exposes functions to interact with Zela JSON-RPC inside procedures.
- Zela AI skills repository — provides
zela-assistantagent skill that can help you with procedure development. - Zela Terms of Service — provides Terms of Service and Privacy Notice for using this product.
Support
If you have any further questions or need help with anything, don’t hesitate to contact us via e-mail at support@zela.io.